Page 1 of 3 123 LastLast
Results 1 to 10 of 27

Thread: Inspired to build an SPR

  1. #1
    Join Date
    Jun 2006
    Location
    GA
    Posts
    3,704
    Feedback Score
    43 (100%)

    Inspired to build an SPR

    After the recent build I did for a friend using the Noveske SPR barrel, my wheels started spinning. I really wanted to do an 18" SPR build. I knew immediately that I wanted to use a genuine Mk12 barrel, as produced for NSW by Crane. There are only two sources for the real deal, Centurion Arms and High Caliber Sales. Both companies have direct ties to NSW and Crane, as well as the company that produces these barrels for the Mk12. HCS had a slightly better price on the barrel, so I called up Kevin and placed an order last Friday. I had a great conversation with him and he is a pleasure to do business with. It shipped out on Monday and arrived Tuesday.

    Barrel Specs:
    Barrel produced from Douglas blank
    Material: 416 Stainless
    Barrel extension: M4 feed ramps
    Chamber: optimized for use with MK262 (Black Hills 77gr equivalent)
    Twist: 1 in 7 right hand
    Contour: for use with OPS inc.
    Length: 18 in and threaded 1/2x28
    Weight: 2 lbs 6.3 oz
    Finished with KG Gunkote - dark gray

    The Rail
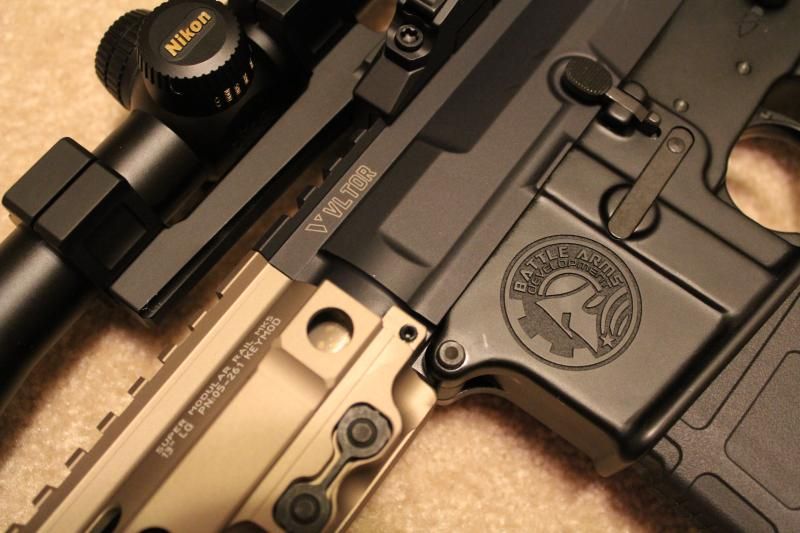
    As I contemplated the build, I knew that I really didn't want to do a Mk12 clone. Instead, I wanted to do my take on a modern Mk12. Preferably, I wanted to use a keymod rail. Additionally, I'm a big fan of the Vltor MUR upper receiver. That was the easy part. Now I needed to narrow down the rail options.

    The BCM KMR was an obvious option for me. I already have one and it's a great rail. But, I've always wanted to do a build with a Geissele SMR. Both rails offer similar features that I desire in a rail. First, they do not require the barrel nut to be timed. Just torque and go. Second, they both allow the rail to be removed easily for cleaning & maintenance. Third, they are both exceptionally well made. I also strongly considered using a KAC URX 4. But as much as I like KAC gear, I can't stand the attachment method of the URX4.

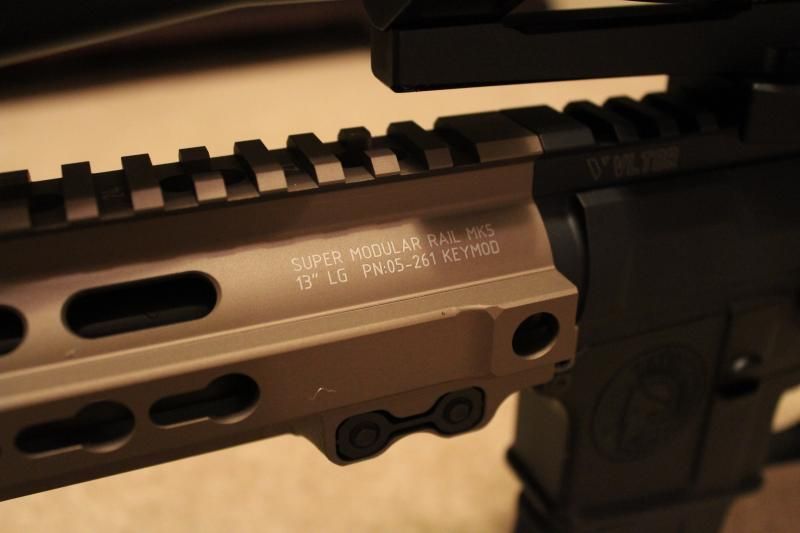
    The more I thought about it, I knew that I really wanted to use a Geissele Mk5 or possibly a Mk4. The only reason I wanted to use the Geissele over the BCM KMR was that I've admired the SMR for a couple of years, but never had a good excuse to use one. But here's the rub, Geissele stopped producing keymod rails last Summer in favor of mlok. The keymod Geissele rails have become near impossible to find. In fact, I found only one dealer in the country that still had a couple left. I could have easily ordered a new Mk8 mlok rail, but I wasn't interested in supporting two different systems. So, I tracked down one of the last Mk5 rails in the country at ROG Tactical. I wanted black, but the Desert Dirt color was all that was left.

    Build list:
    Mk12 barrel
    MUR 1A upper receiver / BCM4 optional
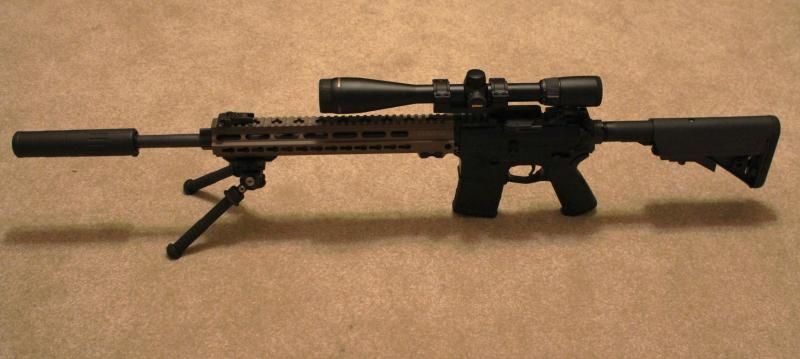
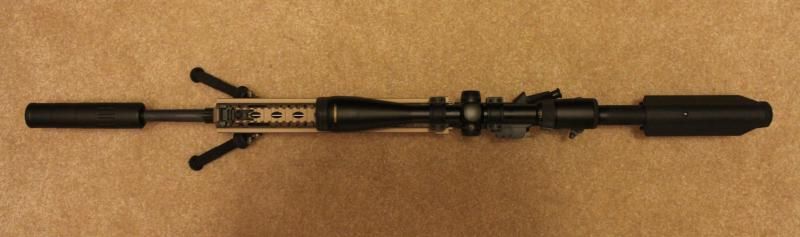
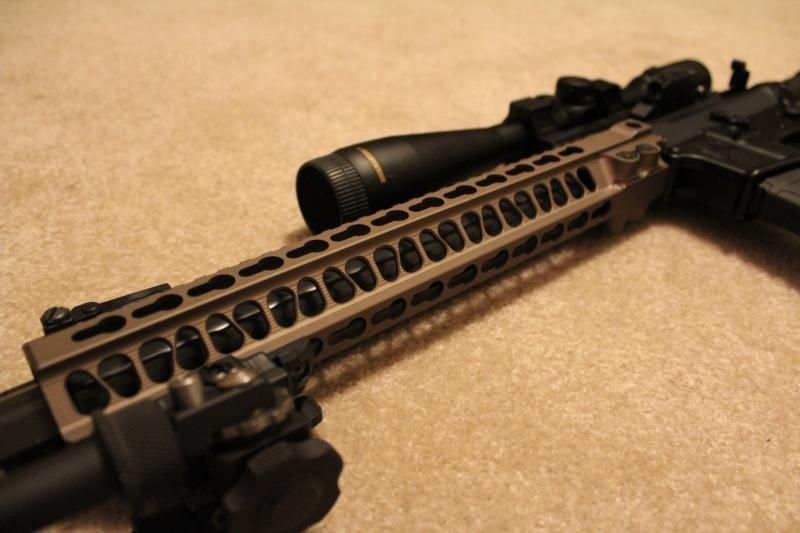
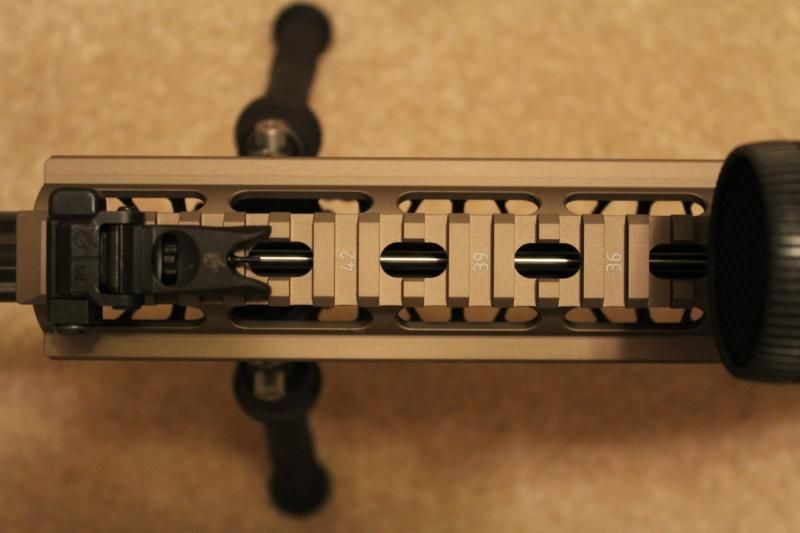
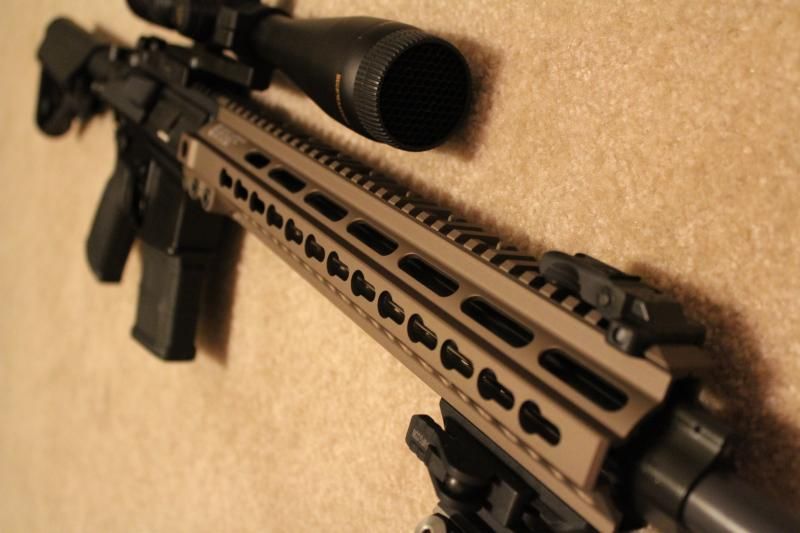
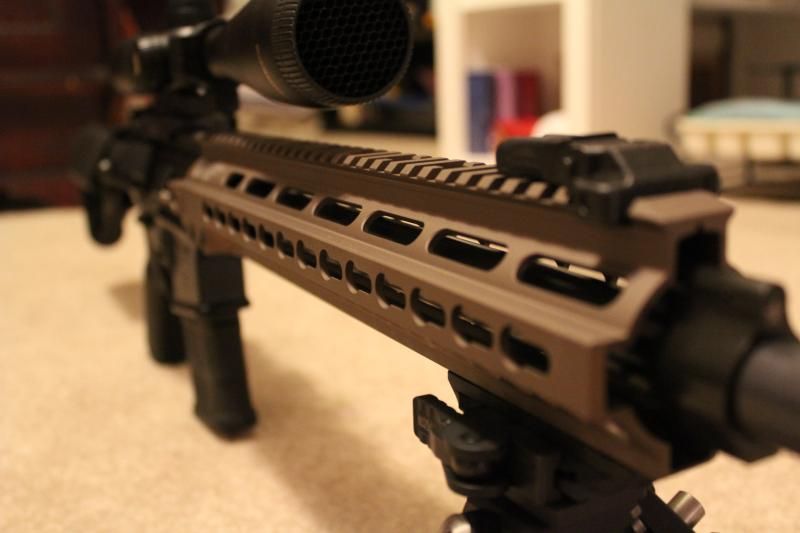
    Geissele SMR MK5 13" DDC
    BCM gas block
    BCM rifle gas tube
    AAC brakeout 2.0
    LMT Enhanced BCG - complete with enhanced bolt
    BCM Gunfighter charging handle Mod4
    KAC Micro 2-600m BUIS
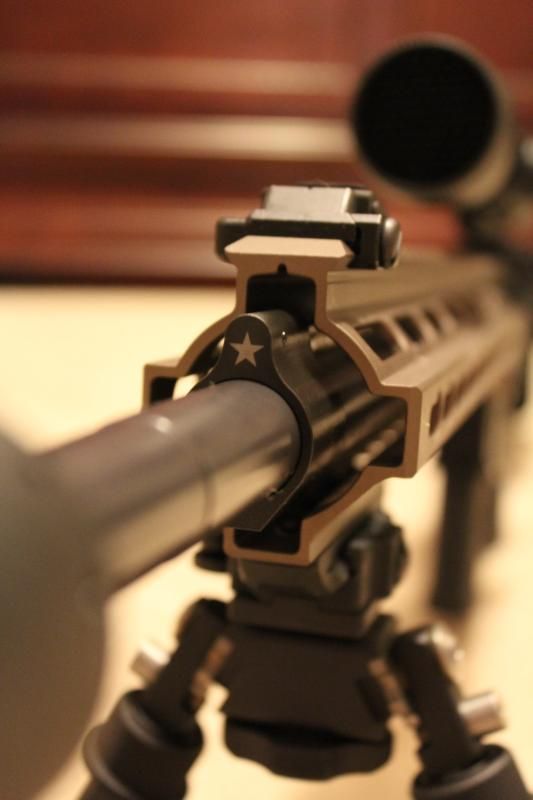
    KAC micro front sight
    Atlas bipod with ADM QD mount

    The completed upper will ride on my Battle Arms Development BAD15 Lower with Geissele SSA-E and other goodies.

    The original SPR barrel


    target crown


    Barrel dimpled for set screws


    Barrel markings


    Step by step...

    Vltor upper receiver was an excellent fit. It slid onto the extension with slight resistance and was tapped into position for the last 1/8" with a nylon mallet. Fit between the Vltor and BCM4 Upper receivers was almost identical. That honestly says an awful lot about the BCM4. It's a very well made forged upper that is definitely held to better tolerances than the average forged upper. I used the Vltor because I've had good success with them in the past and the aesthetics are a bonus.


    Mounted the upper and barrel on the Geissele reaction rod. All assembly procedures were completed on the GRR.


    Umbrella Corp 33 MS milspec anti-sieze used for barrel nut installation.


    Apply anti seize to the upper threads. Grease also applied to the front of the barrel extension shoulder. If you've ever dealt with a barrel nut that was overtorqued, you know that there can be a great deal of stiction between the upper, barrel extension and barrel nut. Application of a small amount of anti-sieze to the front of the extension shoulder can ease disassembly.


    Grease roughly spread onto threads


    Barrel nut is threaded on/off in order to evenly distribute anti-sieze.


    Barrel nut torqued on / off 3 times per the TM in order to mate the threads. Installed at 40 ft/lbs per the Geissele instructions, using their included barrel nut wrench.


    Barrel nut installed

    Last edited by mtdawg169; 02-27-15 at 22:45.

  2. #2
    Join Date
    Jun 2006
    Location
    GA
    Posts
    3,704
    Feedback Score
    43 (100%)
    Barreled upper


    Oil applied to gas block journal. This eases installation and prevents corrosion under the gas block. The gas block journal and BCM gas block were both very well toleranced. Very tight fit, but did not require a hammer to install, nor would it slide around easily.


    Gas block slid into position. Note, a small gap is left between the barrel shoulder and the block. The barrel is relieved for a handgaurd cap and the block should be spaced as if the cap were in place in order to attain good gas port alignment with the gas block.


    Note barrel dimples aligned with screw holes on gas block


    Note, set screws supplied by BCM are knurled. This is preferred, as the knurling bites into the barrel dimples and provides a more secure attachment.

    Screws and gas block threads have been degreased.


    Gas block is double checked for vertical alignment before installing set screws. Screws are then inserted, with one holding the block in position. Loctite (red / high temp) is applied to the other and then installed into the gas block.


    Once the rear screw is installed with loctite, the front screw is removed, loctite applied and reinstalled. Set screws completely installed.


  3. #3
    Join Date
    Jun 2006
    Location
    GA
    Posts
    3,704
    Feedback Score
    43 (100%)
    Gas tube is slid backwards into the upper receiver and then forward into the gas block. Tube port is oriented down.


    Tube is pushed forward into the gas block, making sure that the hole in the gas tube is aligned with the hole in the gas block. Note, daylight is clearly visible through the hole in the gas block.


    One of the best features of the Geissele SMR rails - no alignment necessary!


    Insert gas block roll pin into Geissele roll pin tool. Tool will retain the pin


    Start pin into the gas block.


    Tap in until tool bottoms out


    Pull tool away, pin will be retained by the gas block.


    Using a roll pin punch of appropriate size, fully seat the roll pin.


  4. #4
    Join Date
    Jun 2006
    Location
    GA
    Posts
    3,704
    Feedback Score
    43 (100%)
    Stripped carrier is inserted into the upper to ensure that the carrier does not bind on the gas tube.


    Barrel gets a light coat of Fireclean brushed on before the rail is installed.


    Rail is slid over the barrel and started onto the barrel nut


    Rail is slipped into final position and roughly aligned by hand.

    Bolts installed through rail into dogbone nut. NOT tightened yet.

    PRI alignment tool is installed and clamped down to perfectly align the rail and upper receiver.

    Bolts are snugged up hand tight, per the manufacturer instructions.


  5. #5
    Join Date
    Jun 2006
    Location
    GA
    Posts
    3,704
    Feedback Score
    43 (100%)
    Geissele SMR rails all feature a secondary anti rotation feature, seen here as two small screws, near the receiver. They are torqued finger tight. Once installed, the rail is extremely rigid.


    Rail installation complete


    Muzzle threads cleaned and degreased


    Muzzle device installed to specified torque with Rocksett.

    And DONE!

  6. #6
    Join Date
    Jun 2006
    Location
    GA
    Posts
    3,704
    Feedback Score
    43 (100%)
    Glamour Shots (not really, my photo skills stink)
    I think I'll call it the Mk12 Mod Dawg


    Last edited by mtdawg169; 02-27-15 at 22:50.

  7. #7
    Join Date
    Jun 2006
    Location
    GA
    Posts
    3,704
    Feedback Score
    43 (100%)


  8. #8
    Join Date
    Sep 2010
    Location
    Texas
    Posts
    43
    Feedback Score
    0
    Nice write-up.

  9. #9
    Join Date
    Feb 2015
    Location
    Baltimore MD
    Posts
    33
    Feedback Score
    0
    How do you like the Geissele Rails?

  10. #10
    Join Date
    Feb 2014
    Location
    USA
    Posts
    1,710
    Feedback Score
    204 (100%)
    Nice rig. I also love the Geissele rails. Their bullet proof! How do you like the bipod. I am looking for one for my SPR, and consider the same atlas you have there.
    Philippians 4:13

Page 1 of 3 123 LastLast

Bookmarks

Posting Permissions

  • You may not post new threads
  • You may not post replies
  • You may not post attachments
  • You may not edit your posts
  •