Love Aervoe.

|
||||||||||||||||||||||||||||||||||||||


 Senior Member
Love Aervoe.
Scout Rider for the Mongol Hordes
Member
Base coat was aervoe field drab & light green. Contrast added with aervoe sand & USMC green (looks black), and also some krylon camo khaki (which is more gray, less yellow than aervoe sand). Mag is lightly faded khaki...
There is also some aervoe coyote, light coyote, earth red, and olive drab here and there. These colors were used more sparingly to help fade, add depth & variation.
Not sure how well this will hold up on the sb15 or it's strap, but so far so good. Easy to touch up if it does chip. My cat seems to dig it. :-)

Last edited by Frank_Castle; 10-20-15 at 14:53. Reason: Add detail
 Senior Member
Just rustolium
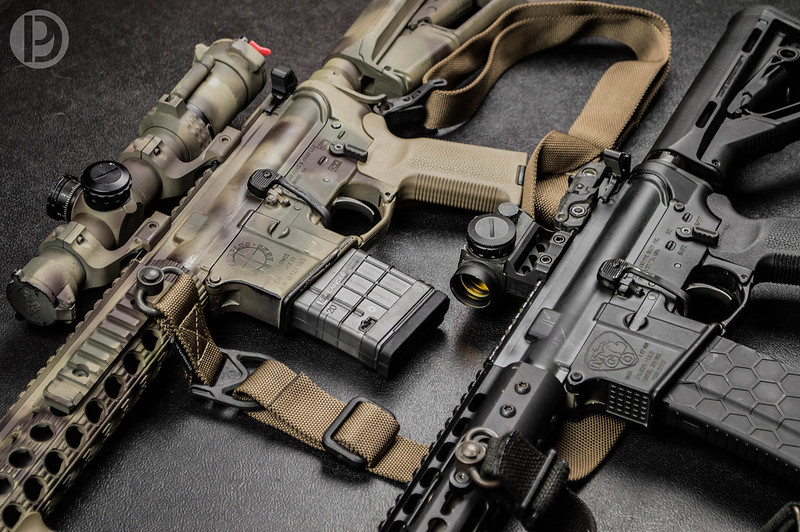
Two ARs by David Pyzik, on Flickr
Sent from my SM-N910V using Tapatalk
Ground Defense 1, Blade Defense 1, Defensive Pistol 1 & 2, Alliance Shoothouse, YSINTG, Carbine 1, NRA Range Safety Officer
david@damagephotos.com
Damage Photos on Facebook
@damage_photos on Instagram
 Senior Member
splendidOriginally Posted by caporider

"Bones Heal, Chics Dig Scars, Pain Goes Away"
 Member
New KMR-A, not that you can tell by the photos. Love how Aervoe changes based on lighting.

Last edited by jdavis6576; 10-22-15 at 10:07. Reason: Photobucket sucks!
 Member
Looks Great!
What kind of stencils did you use?
Member
Thanks! No real stencils, except the punisher logo from eBay.
Used scraps of cardboard and heavy paper that I cut slits and holes into... Most of them about the size of a nickel or so. Punched a hole with my pocket knife, twisted a little to spread it, and left the edges rough.
Using these "stencils" (if you want to call them that) I sprayed through, moving the stencil as I went to make stripe-ish patterns. It was all pretty free hand really.
Longer, thin slit cuts (2-3") were used for larger lines and splattering areas... Kind of hold the stencil at an angle so the spray hits the stencil and oversprays on to the gun.
Some spots went on a little heavy and dripped or splattered. Simply blew on thick spots to spread and flatten it out. Looks cool up close. Lots of layers on layers!
Also added some very light splatter of dark green and tan throughout. Misted very lightly from a distance. Works well to soften edges and blur colors a bit. Hard to see unless you are right up on it though.
I really like how it came out - but I admit it took a lot more time and thought than most would spend on a gun camo rattle job!
My best advice is to play with different stencils, angles, and distances as you spray. Don't be afraid to experiment. Use a toy gun or hard case or something else to practice on.
A good color palette makes all the difference. Having multiple shades can add needed variation and subtlety. Be mindful of how colors blend and contrast. Those are key concepts to consider.
Hope that helps. Ymmv.

Last edited by Frank_Castle; 10-24-15 at 17:43.
Member
Senior Member
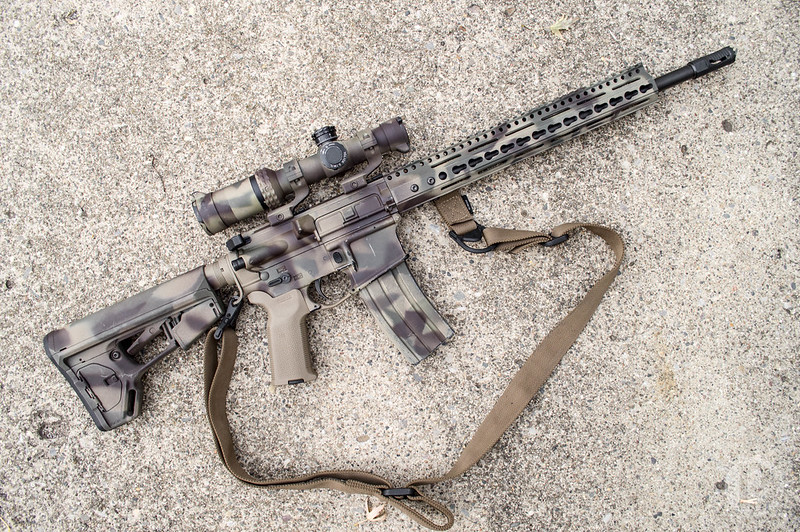
Still need to swap out the end plate, muzzle device, forward grip of some sort (BCM?) and swap this sling.
New Rail Painted by David Pyzik, on Flickr
Ground Defense 1, Blade Defense 1, Defensive Pistol 1 & 2, Alliance Shoothouse, YSINTG, Carbine 1, NRA Range Safety Officer
david@damagephotos.com
Damage Photos on Facebook
@damage_photos on Instagram
 Member
Did this one a few months ago. Krylon rattle can, tan with brown and olive green over it. Used a small mesh laundry bag.

 Posting Permissions

 Reply With Quote


Bookmarks