Page 2 of 3 FirstFirst 123 LastLast
Results 11 to 20 of 23

Thread: Glock Stippling Question...Edit: Well I finally did it

  1. #11
    Join Date
    Jul 2009
    Location
    Arizona
    Posts
    1,217
    Feedback Score
    45 (100%)
    Thank you for the suggestions thus far. I'm thinking that I'm pretty much done, except for cleaning up some rough edges or possibly extending the stippling higher up on the frame and lower down the grip. It isn't as shiny as the magloader and all the extra shine is because of a CPF bulb right over the plastic as I'm trying to photgraph it. It doesn't look as refined as some of the work I've seen, but hey, I'm just a non-handy guy trying to learn to be handy.

    I don't have particularly sweaty hands so this amount of texture feels right to me. Now to get out and actually shoot it... I haven't really shot a Glock without the Hogue grip since I bought my Glock over 2 years ago so this is going to take some getting used to.

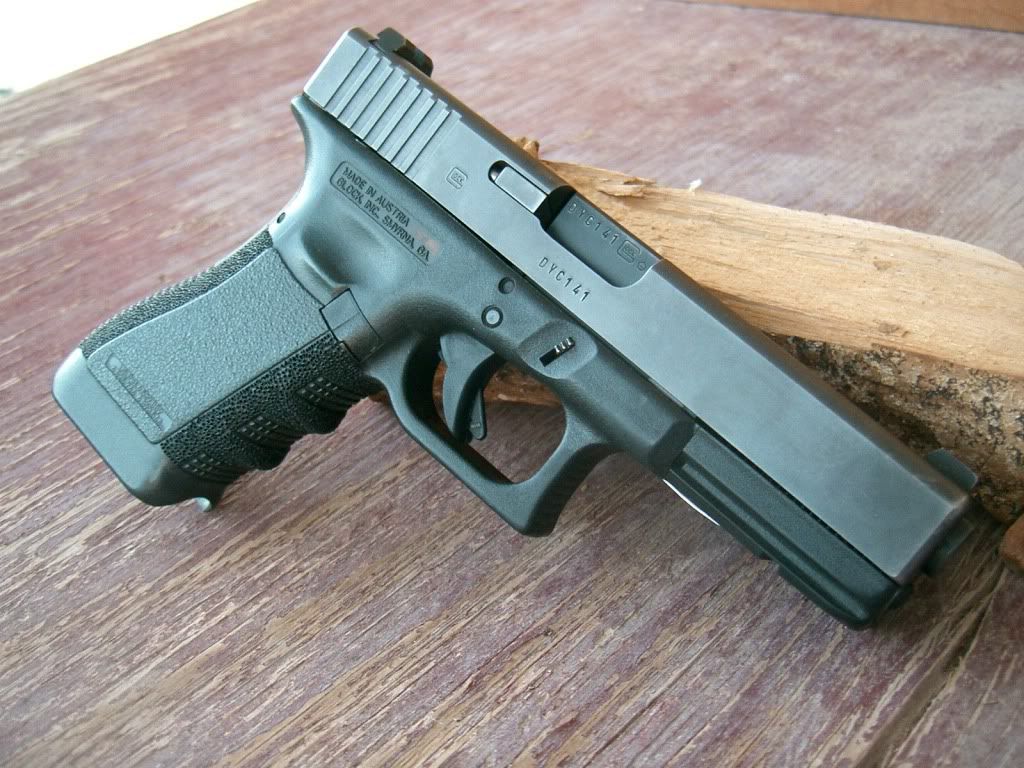
    This was done with the 40 watt soldering iron, with a very narrow tip, and then I hit areas with a few light passes of 600 grit sandpaper where it seemed to chew into my hands. I sanded much of the original Glock texturing down, but not completely, before starting, and I removed the lower finger groove, but not the upper. The trigger guard was also sanded down. Edges were kept as straight as possible using blue painters tape as a border.


    Last edited by uwe1; 02-06-11 at 14:55.

  2. #12
    Join Date
    Oct 2010
    Location
    Western Michigan
    Posts
    40
    Feedback Score
    0
    That looks awesome!! Great work. How did you remove the finger groove?
    Well its only a 9 mm.
    Well when I put two through your heart and one through your head you wont know the difference.
    Unknown Navy SEAL

  3. #13
    Join Date
    Jul 2009
    Location
    Arizona
    Posts
    1,217
    Feedback Score
    45 (100%)
    Quote Originally Posted by Semizal0311 View Post
    That looks awesome!! Great work. How did you remove the finger groove?
    I used a Dremel to take off the bulky majority of it, then placed the Dremel perpendicular to the grip and rotated the grip to maintain the front curvature. After that, I sanded the surface down with 600 grit sandpaper. I also slightly reduced the size of the first groove, but kept it there.
    Last edited by uwe1; 12-16-10 at 21:44.

  4. #14
    Join Date
    Nov 2010
    Posts
    1,084
    Feedback Score
    3 (100%)
    I think it looks pretty good. It's even yet random. Nice work.


    Okie John

  5. #15
    Join Date
    Feb 2008
    Posts
    2,951
    Feedback Score
    32 (97%)
    I been practicing too before I go to work on my Glock. The thing is, they're all different. My Moe and RVG was really easy. My Miad, AFG and pmags not so much. Miad and the pmags were krylon'd already though. Other random plastic laying around the house vary as well.
    I must study politics and war, that our sons may have liberty to study mathematics and philosophy. - John Adams

    The AK guys are all about the reach around. - Garand Thumb.

  6. #16
    Join Date
    Sep 2007
    Location
    AZ
    Posts
    32,948
    Feedback Score
    14 (100%)
    I got the wood burning kit from HarborFreight and did a similar style of stipple. I ususally hate the stipple jobs as most people go way overboard. But my old g22 was so slippery there was no downside risk.


  7. #17
    Join Date
    Jul 2009
    Location
    Arizona
    Posts
    1,217
    Feedback Score
    45 (100%)
    Quote Originally Posted by markm View Post
    I got the wood burning kit from HarborFreight and did a similar style of stipple. I ususally hate the stipple jobs as most people go way overboard. But my old g22 was so slippery there was no downside risk.

    My first attempt went up as high as yours, but I had also done the finger grooves, finger texture area, and backstrap. After messing around dry-firing for a day, I stippled a little higher because I found that the meat of my left thumb was able to get a bit better friction that way.

    I really like what you did though. It's simple, clean, and effective. I believe you've posted that pic before and it was one of the ones I looked at before I started.

  8. #18
    Join Date
    Oct 2010
    Location
    Northern Colorado
    Posts
    5,169
    Feedback Score
    60 (100%)
    On my G19, I only stippled the right side, as it is a carry gun. I also stippled where my thumbs naturally rest and under the trigger guard. No need to stipple where you dont even to come into contact with the pistol. Id highly recommend stippling on the underside of the trigger guard though.

  9. #19
    Join Date
    Jul 2009
    Location
    Arizona
    Posts
    1,217
    Feedback Score
    45 (100%)
    Quote Originally Posted by LowSpeed_HighDrag View Post
    On my G19, I only stippled the right side, as it is a carry gun. I also stippled where my thumbs naturally rest and under the trigger guard. No need to stipple where you dont even to come into contact with the pistol. Id highly recommend stippling on the underside of the trigger guard though.
    What benefits do you experience with the underside of the trigger guard stippled? I'm trying not to get carried away.

  10. #20
    Join Date
    Sep 2007
    Location
    AZ
    Posts
    32,948
    Feedback Score
    14 (100%)
    Good question. I refused to stipple any NON-grip area of my gun. For me.. on the Glock.. that's the four "corners" of the grip area.

Page 2 of 3 FirstFirst 123 LastLast

Bookmarks

Posting Permissions

  • You may not post new threads
  • You may not post replies
  • You may not post attachments
  • You may not edit your posts
  •