Page 13 of 18 FirstFirst ... 31112131415 ... LastLast
Results 121 to 130 of 177

Thread: Favorite Drills

  1. #121
    Join Date
    Apr 2007
    Location
    FL
    Posts
    9,328
    Feedback Score
    28 (100%)
    Some good intermediate skill level carbine/rifle drills:

    A recent post brought up the MD BSA Drill, which is a very good drill.
    HERE is a link to the original thread and post by Travis.

    Quote Originally Posted by SIMPLYDYNAMIC View Post
    Balance of Speed & Accuracy (BSA Drill/Qual)

    100 rds total fired from Rifle, all rds fired into the torso (10in circle) on target the first time we do this in a class we cut out the circle completly so that other shooters cant look up and down the line and see who has the tight little groups. This theory pushes each shooter to their individual failure point and when they miss they (or hit paper) they know they have reached it.

    This Drill was designed by MD instructors to help shooters continue to climb the ladder of excellence. No matter what level we are at be it: beginner, novice, SPECOPs, CIA Ground Branch 007, Grand Master, badass etc.... we always have the ability to excel. (this will be seen in AOTTC II)

    Example #1: If you are a beginner shooter and your fundementals are good and consistant but are getting a 40% hit rate on the BSA and barely making the times then you have reached your failure point and the direction of traingin is obvious.

    EXample #2: IF You are an "Advance Shooter" and you are getting your hits in 1.5 sec and you are meeting the time and you are getting tight little groups then you are NOT reaching your failure point and can become even faster.

    It was also designed to get 100% if the perfect balance of speed and accuracy were found and the core principles of Efficency, Consistancy, & Reality were executed.


    5yrd line
    Dynamic Stance
    Time: 2 sec par on shot clock
    total rds: 20
    -4rds per iteration, 5 iterations

    10yrd line
    Dynamic Stance
    Time: 2 sec par on shot clock
    total rds: 20
    -4rds per iteration, 5 iterations

    15yrd line
    Dynamic Stance
    Time: 2 sec par on shot clock
    total rds: 20
    -4rds per iteration, 5 iterations

    25yrd line
    Dynamic Stance
    Time: 2 sec par on shot clock
    total rds: 10
    -2rds per iteration, 5 iterations

    50yrd line
    Dynamic Stance
    Time: 2 sec par on shot clock
    total rds: 10
    -2rds per iteration, 5 iterations

    75yrd line
    on Beep go from standing to Dynamic Kneeling fire 2 shots
    Time: 4 sec par on shot clock
    total rds: 10
    -2rds per iteration, 5 iterations

    100yrd line
    On Beep go from standing to Dynamic Prone then fire 2 shots.
    Time: 4 sec par on shot clock
    total rds: 10
    -2rds per iteration, 5 iterations
    Another excellent drill is from VTAC, the Half and Half Drill.
    10 shots
    Target- 8" Circle
    Distance- 20 yards
    Position- Standing Alert
    Time- 10 seconds

    Once successful, and maintaining the same accuracy standard, move onto:
    10 shots
    Distance- 10 yards
    Position- Standing Alert
    Time- 5 seconds

    Once successful, and maintaining the same accuracy standard, move onto:
    10 shots
    Distance- 5 yards
    Position- Standing Alert
    Time- 2.5 seconds

    This drill forces the shooter to rapidly assume an aggressive recoil controlling position, rapidly drive the gun to the target to acquire the sights, and deliver 10 shots at a distance-relevant cadence.
    Last edited by Failure2Stop; 10-21-09 at 19:07.
    Jack Leuba
    Director of Sales
    Knight's Armament Company
    jleuba@knightarmco.com

  2. #122
    Join Date
    May 2009
    Location
    PA
    Posts
    223
    Feedback Score
    0
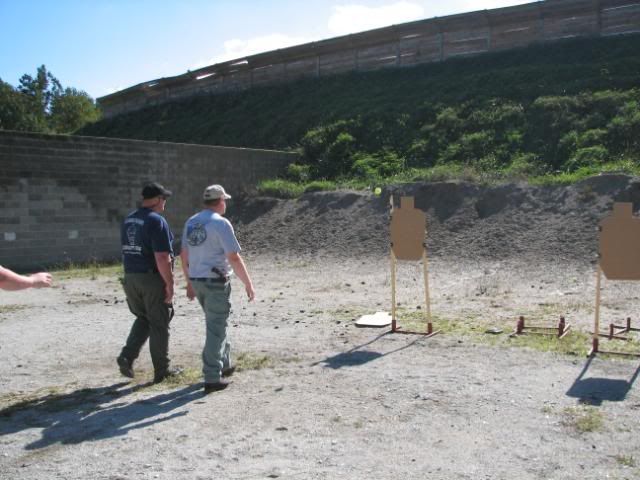
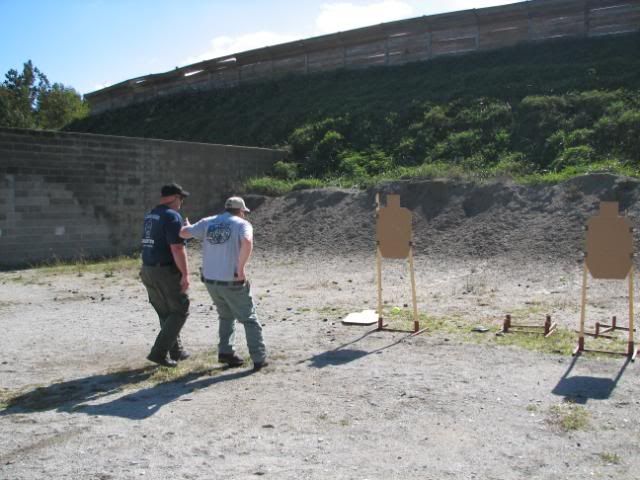
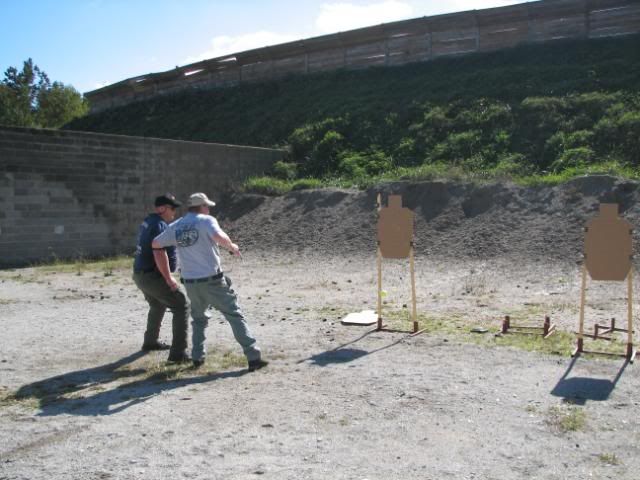
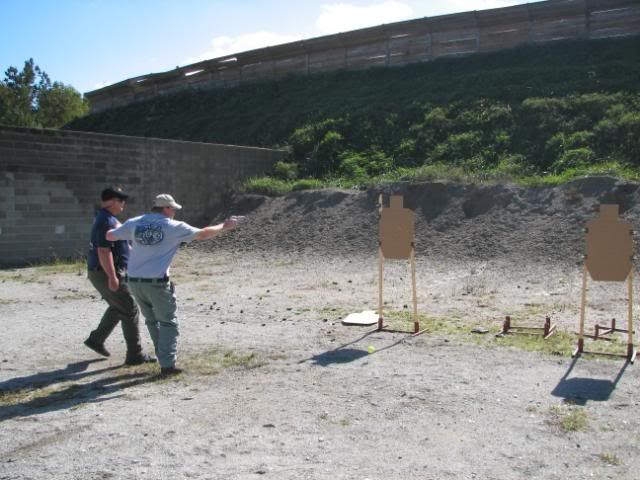
    MCS Drop Step Control Drill

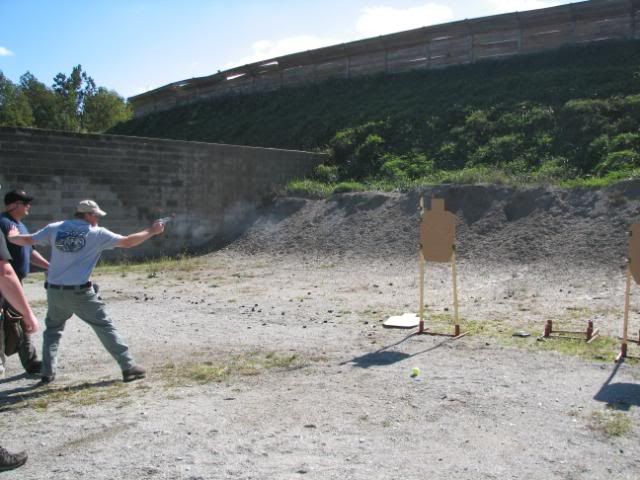
    Student walks down range with another student simulating loved one (protectee) on his reaction side. A visual cue is introduced, in this case a tennis ball. Student utilizes his natural reaction side arm to gain control of his protectee while drawing his pistol one handed and engages target. Primary goal is to take control of and move the protectee while placing yourself between the protectee the threat while creating distance to the direction offered in the environment. The second goal is to put effective rounds on the target. Be sure to look at the position of the tennis ball in the pictures. It takes the average person 3/4 of a second to process and decide a response to a given stimuli. When you are told that upon seeing the ball you need to use both of your hands, gain distance and engage the target...well, things get a little crazy. No quite as easy as putting rounds in to a target using both hands in reaction to a buzzer.


    Last edited by mercop; 10-22-09 at 09:18.

  3. #123
    Join Date
    Apr 2007
    Location
    FL
    Posts
    9,328
    Feedback Score
    28 (100%)
    mercop-
    With regard to the drill you posted above:
    Why use a common non-threatening item to cue lethal force?
    What is your acceptable accuracy standard?
    What is the distance envelope you are applying this technique to?
    How many rounds are to be fired or what is the signal to stop firing?
    What is the time goal for first shot and drill completion?

    Thanks
    Jack Leuba
    Director of Sales
    Knight's Armament Company
    jleuba@knightarmco.com

  4. #124
    Join Date
    May 2009
    Location
    PA
    Posts
    223
    Feedback Score
    0
    mercop-
    With regard to the drill you posted above:
    Why use a common non-threatening item to cue lethal force? Because tennis balls are cheap, easy to carry, can be introduced from anywhere on the range and can be color coded for shoot don’t shoot. And throwing knives at students would most likely anger them

    What is your acceptable accuracy standard? All shots Center line from groin to head..

    What is the distance envelope you are applying this technique to? Conversational distance, I usually use the example of how close you would be arguing over a parking space.

    How many rounds are to be fired or what is the signal to stop firing? During this particular I say 3-5 but that is not cast in stone. I call cease fire.

    What is the time goal for first shot and drill completion? During this class I never give the students a time, I don’t have to, they always go as fast as they can anyway. First we do this with Blue Guns, and then airsoft, then live fire, and then back to airsoft for force on force. When doing this live I start with a regular target, then onto one balloon. Then onto two balloons on two targets. The balloons, water balloon size are a great training tool. It is amazing how people become fixated on popping the balloon and when they fail to do so, stop moving and continue to fire instead of moving to a better position as instructed.

  5. #125
    Join Date
    Jul 2009
    Location
    Upstate NY Otsego Lake area, Fl, Carib. & Panama, depending on the sailing season and my mood.
    Posts
    275
    Feedback Score
    0
    Quote Originally Posted by ToddG View Post
    That's a loaded question, pardon the pun.

    I'm not a big fan of jumping from gun to gun. We call it Simon's Inverse Multi-gun Paradox, aka The SIMP Principle.

    I'm neutral on the .22 kit thing, though. My personal experience is that it encourages sloppiness in grip and other recoil management skills. At the same time, it can be incredibly beneficial for working on marksmanship, reset, and gun handling skills. With the price of ammo going through the roof, it's hard to tell people not to use a .22 kit. I just think you need to stay away from anything related to fast multiple shots. A .22 kit is essentially dry-fire with a bullet hole and slide action.

    Another thing I'd recommend for someone going the .22 kit route: start and end every shooting session with your "regular" full power ammo. Put the rimfire practice in the middle. Get to the range and confirm you're doing things right. Before you leave the range, get the feel of full recoil back.
    BIG +1 here.

    Guys are always asking if the can shoot their conversion kits during our training courses.

    My response is yes. But they must run all the drills at least once in the actual caliber of what they are carrying. Otherwise in my opinion they are fair weather training and will fail when the real deal comes on.
    Ed Fernley
    Pathfinder Operations
    Semper Primus!


    "I'M THE ONE WHO BARKED AT THUNDER, ROARED AT LIGHTENING, MADE DEATH WONDER."

    AND

    “Wherever I go, everyone is a little bit safer because I am there.
    Wherever I am, anyone in need has a friend.
    Whenever I return home, everyone is happy I am there.
    It's a better life!”- Robert L. Humphrey “Warriors Creed"


    "John has a long mustache."

  6. #126
    Join Date
    Mar 2009
    Location
    houston
    Posts
    253
    Feedback Score
    2 (100%)
    i did the BSA template today and set out my 100 rounds but only made it to the 25 yard line. out of 100, 27 were outside the 8inch circle (IDPA target) with the farthest one being about 2 and half inches out.
    Last edited by htxred; 01-25-10 at 17:37.

  7. #127
    VMI-MO Guest
    DISCLAIMER: these drills require alot of movement which is potentially dangerous. Use your head, do not be stupid, follow the firearms safety rules.


    Tourettes Guy

    Shooter starts at either the 0m line or the 200m line depending on the capabilities of the range. The shooters primary weapon is left at the 100m line in condition 4. The shooter is in full kit/battle rattle/ or whatever gear he finds himself in the most.

    Shooter sprints 25m, drops and does 10pushups. Shooter then sprints the next 25m and does 10 burpees. Shooter sprints 25m again and does 10 star jumpers.
    Shooter then sprints to the 100m line. He will then pick up his rifle, load and make ready then proceed to engage a 10”x10” steel plate or similar sized reactive target for instant feed back from the standing position. Once the shooter has hit the target twice he then begins the following course of fire
    Range Position Target Rds
    100m prone COM 5
    75m sitting COM 5
    50m kneeling COM 5
    25m standing COM 5
    15m standing Brain Box 5
    15m-7m Moving fwd COM 5
    7m Standing 3rds COM/2rds Brain

    Time is continuous from when you first start the 25m sprint to when you fire the last shot. Do not walk to each different range. SPRINT.

    The point of this drill is to run through the entire thing as fast as possible, while still scoring accurate hits. You will be gassed, breathing heavy, your heart rate will be up. This will force you to overcome this unpleasantness and get the hits you need. It will also give you practice in assuming quick/hasty prone, kneeling and sitting positions. Finally this drill will shake out your kit and expose anything that might be hampering mobility.

    I have always used the (-0) zone of an IDPA and a 3”x5” brain box. However, after some recent shooting I will be switching my COM to a 5”x8” box.

    The original idea for this drill came from Paul Howe’s 100-7 drill.
    http://www.youtube.com/watch?v=d7MXPH1Fg_8

    She’s a Bitch
    The credit for this Drill goes entirely to Rob Shaul at Military athlete www.militaryathlete.com

    10 Rounds for Time
    5x Up Downs (burpee in full kit and helmet - except don't do the jump and clap)
    1x hit on Target from the prone position on an 8”-10” reactive target

    Proficiencey levels
    LEVEL I - Complete in 12 minutes, 60 round limit broken into 6 mags @ 10 rounds each
    LEVEL 2 - Complete in 9 minutes, 45 round limit broken into 5 mags @ 9 rounds each
    LEVEL 3 - Complete in 6 minutes, 30 round limit, broken into 6 mags @ 5 rounds each
    LEVEL 4 - Complete in 3 minutes, 15 round limit, broken into 5 mags @ 3 rounds each

    http://www.youtube.com/user/robshaul#p/u/14/gvw9ECvyRio


    18 Hole Sprint
    This drill was originally based off of VTAC’s 9 hole drill.

    For the setup there are two VTAC barricades arranged 10m-25m apart at the 100m line. For the range I use this is limited to about 15-18m apart.

    The shooter is in full kit and starts 1m back from the target. On the go command he moves forward to the first port on the barricade. He engages a reactive target until he scores a hit. Once he has scored one hit he makes movement to the other barricade to score a hit through another port. The shooter continues to move from barricade to barricade and shoots through each port until a hit is scored. Once the shooter has scored a hit through each port on each barricade the drill ends.

    The purpose of this drill is to become proficient in quickly dropping into alternative shooting positions when gassed and on the move. I have noticed a lot of people just settle into an alternative position and fire a few rounds. This helps some, but forcing the shooter to learn the body mechanics of assuming different positions while stressed and tired will only teach the shooter more about his strengths and weaknesses and give him more confidence in his abilities.

    Back and Forth
    Shooter stands 10-20m away from two targets that are spaced at least 10-15m apart. On the go command the shooter engages the first target with 2rds COM, then drives his weapon to the second target and puts 2rds COM. Shooter drive the weapon back to the first target and puts 2rds into a 3”x5” brain box, then proceeds to do the same to the second target.

    This drill really requires and forces the shooter to drive the gun hard in order to get satisfactory times. The brain box shots were added at the final stage of the drill to force the shooter to slow down, pick up his sights and push for accurate hits instead of blazing and a COM target.

    Fight Gone Bad (Not the Cross fit one)
    The matrix below shows the rounds allotted to what target at what range. This entire course of fire is run continuously. Once time starts it does not end until the shooters final shot at the 100m mark. The shooter starts at the 0m mark. All shooting is done from the standing or a “dynamic kneeling” position.
    Range Target Rds
    25m 5rds COM 2rds Brain 7
    50m COM 5
    75m COM 5
    100m COM 5

    Bust a Move


    For this drill you will need about a 15-20m wide lane. With 2 targets arrayed 50m away from the start point. Each 10m Interval is marked somehow. Shooter starts on the right hand side of the lane and fires 5rds into each COM of both targets. He then moves to the left hand side of the range at the 40m line. He shoots the targets with the same amount of rounds as allotted above. The shooter continues this zig zag pattern all the way to the 10m line stopping at each 10m interval to dish out some rounds.

    This drill gets the shooters heart rate up and forces the shooter to once again drive the weapon from target to target. Also with the higher round count strings the shooters platform/stance/grip has to be developed to take long strings of fire. On top of this the shooter will begin to understand what he needs to do in order to drop into his firing platform from the move. Also it exposes the shooter to having to react to threats that are presented on his left and right flank.


    As you can see I prefer more physical drills. IMO this puts more stressors and requirements on the shooter to only better them in the long haul.


    PJ

  8. #128
    Join Date
    Feb 2008
    Posts
    1,717
    Feedback Score
    2 (100%)

    Smile

    I love this version of the 100 yard aggregate drill - this is a version I learned from Kyle Lamb (July 2009 Street Fighter class).

    Target: NRA B8-C(P) 25 yard Repair Center Pistol Target

    A) Eat a real heavy meal (five cold beef stew MRE's or caloric equivalent ), wash down with copious amounts of your choice of warm buttermilk, jolt cola, and/or mountain dew.

    B) Immediately afterwards, saddle up in full kit. Helmet, plate carrier, 8 loaded primary weapon mags, 4 loaded secondary weapon mags, drop-leg pistol holster, pistol, full camelbak, and whatever else you have.

    C) Load and make ready your carbine.

    Starting at the 125 yard line, from standing low ready:

    1) Sprint as fast as you can to the 100 yard line. Assume the prone position. 10 shots in one minute. Once the minute is up...

    2) Sprint as fast as you can to the 75 yard line. Assume the sitting position. 10 shots in one minute. Once that minute is up ...

    3) Sprint as fast as you can to the 50 yard line. Assume the kneeling position. 10 shots in one minute. Once that minute is up ...

    4) Sprint as fast as you can to the 25 yard line. 10 shots from the standing position.

    Following are some variations on this drill that I've just thought up:

    Repeat 1-4 but with weak shoulder.

    Repeat 1-4 but shooting one handed (do be especially mindful of your muzzle) from the prone, the stacked feet sitting (or double knee pickup) and kneeling positions.

    Scoring: Anything in the black is ten points. Anything outside is a miss. 400 possible points.
    Last edited by 30 cal slut; 03-17-10 at 07:22.
    Doing my part to keep malls safe

  9. #129
    Join Date
    Jun 2006
    Posts
    6,023
    Feedback Score
    13 (100%)

    Modified Dot Torture

    Modified Dot Torture

    This is the Dot Torture Drill, but with two different distances and changing par times:

    Dot #1: Five Yards

    Dot #2: Three Yards, Two Second Par Time

    Dots #3 and #4: Three Yards, Three Second Par Time

    Dot #5: Five Yards

    Dots #6 and #7: Three Yards, Four Second Par Time

    Dot #8: Five Yards

    Dots #9 and #10: Three Yards, Five Second Par Time

  10. #130
    Join Date
    Jun 2006
    Location
    Virginia
    Posts
    0
    Feedback Score
    3 (100%)
    M4arc and I used to shoot David's Dot Torture Drill all the time. I need to get back using that drill. I bet I've still got a stack of his targets printed out.

    http://www.personaldefensetraining.c...dottorture.php

    This is a marksmanship drill, fired at 3 yards or further. Targets are ten 2" dots numbered. A total of 50 rounds is needed. You will perform: 22 draws and holster, depending on magazine capacity 5-10 administrative or speed reloads, obtain 83 sight pictures and press the trigger 50 times.

    * Dot #1- Draw and fire one string of 5 rounds for best group. One hole if possible, total 5 rounds.
    * Dot #2- Draw and fire 1 shot, holster and repeat X4, total 5 rounds.
    * Dot #3 and 4- Draw and fire 1 shot on #3, then 1 shot on 4, holster and repeat X4, total 8 rounds.
    * Dot #5- Draw and fire string of 5 rounds, strong hand only, total 5 rounds.
    * Dot #6 and 7- Draw and fire 2 shots on #6, then 2 on #7, holster, repeat X4, total 16 rounds.
    * Dot #8- From ready or retention, fire five shots, weak hand only, total 5 rounds.
    * Dot #9 and 10- Draw and fire 1 shots on #9, speed reload, fire 1 shots on #10, holster and repeat X3, total 6 rounds.

    When you can do this clean on demand, extend the length or start timing and work on speed but maintaining accuracy. If a single shot is missed, you flunk. Only hits count and only perfect practice makes perfect.
    Paul A. Hotaling
    Alias Training & Security Services, LLC
    Paul@aliastraining.com
    757-215-1959 (Mon-Fri 8AM-5PM)
    757-985-9586 (After Hours)
    www.aliastraining.com


Page 13 of 18 FirstFirst ... 31112131415 ... LastLast

Bookmarks

Posting Permissions

  • You may not post new threads
  • You may not post replies
  • You may not post attachments
  • You may not edit your posts
  •